Image resolution is the best method of controlling how small your graphics will be. So, the smaller the resolution of your image, the faster your image will load in a browser. But how small?
Image resolution refers to the spacing of pixels in an image and is measured in pixels per inch or ppi. This is also sometimes called dots per inch or dpi when you work with printed material. The higher the resolution, the more pixels per inch, which translates to more detail within the image. A file that has very low resolution will look like it is made up of small squares and edges will look like jagged lines or it will be very fuzzy and out of focus depending on if you use a GIF or JPEG respectively. For example:
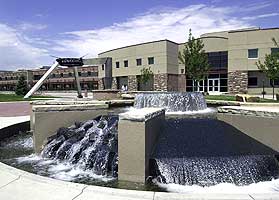
JPEG (72 ppi @ 16.9 Kb)
JPEG (32 ppi @ 8.1 Kb)
On the other hand, if you have too much resolution for your image file then the image will take much longer to download to your browser. A common mistake with novice web designers is to use an image file that they used in a brochure or printed page and place that same file in their web page. Images created to be printed usually have a dpi of 300 to 600 dpi. High-end printers can even print at up to 2400 dpi. Those resolutions are far too high for web pages and will create an image that will take forever to download, even with a DSL or cable modem connection. These large resolution images can also tend to be far too large in “physical” size on the computer monitor’s screen, filling the browser’s window and forcing the user to scroll to see the entire image.
The solution
A typical computer monitor displays a maximum of 72 ppi. That means that there can only ever be a total of 72 pixels per inch displayed on your monitor no matter what is being displayed. If you attempt to show an image that is 300 dpi on a monitor, all extraneous detail that is contained in that high resolution file is lost to the viewer. And so it makes sense that the maximum resolution you should use for all image files you create for the web should be 72 ppi. And it is best not to use a resolution lower than 72 ppi because you then start to lose the quality of the image.
This also means that you should never use images for an important document that have been created for the web. Because the resolution is far too low to show any great detail on paper.
Tips
One very important tip when using an image editor to create web-based image files is to always start (if you can) with a reasonably high resolution file and use it as a “master” file. Never use a low resolution file as your original image because you simply don’t have enough detail to work with. Once you have edited your file, you can then choose “Save as…” to save to a separate new file to use in your web pages. All of your artwork files should be stored somewhere in their full original resolution and in the file format of your graphics program (such as Photoshop’s PSD format).
Another thing to avoid is to use a JPEG image as your master file. Because of the compression used with a JPEG image, a lot of data is lost each time you create one. So if you make a JPEG image of an original JPEG file, you are asking for trouble. The result will be a very poor image with many JPEG artifacts as shown in the previous page.
If you need to know how to include an image into your web page read HTML Basics.