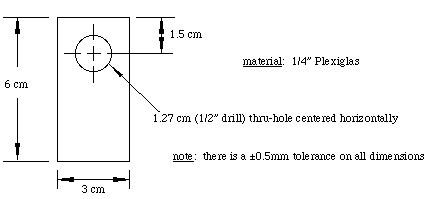
A manufacturer wishes to perform automated inspection at the end of its assembly line to result in better quality control of its product. The widget produced by the line has a rectangular shape with an off-center hole (see figure below). Due to flaws in the manufacturing process, sometimes the hole is not present. The manufacturer wants a system that can separate and count “good” (with hole) and “bad” (without hole) widgets automatically, quickly, and reliably.
Each group must design and build a widget inspection device. Your group’s grade for the project will be based on the level of performance that your device achieves and on several scoring adjustments as described below.
Levels of Performance
The levels of performance along with their corresponding scores (based on a scale of 100) are:
Level 0 (0)
No device.
Level 1 (65)
You place a single widget into your device and press a single button (with mechanical and/or electrical action). If the widget is “good” your device should turn on a green LED, and if it is “bad” your device should turn on a red LED. The device must work for several “good” and “bad” widgets, one at a time.
Level 2 (75)
Level 1 plus your device should provide a digital display of a running count of the number of “good” widgets and the number of “bad” widgets. The number of “good” and “bad” widgets will each be limited to a maximum of five; thus, only single digit displays are required. Your device must have a reset button
so the counts can be returned to zero at any time.
Level 3 (85)
Level 2 except your device must first be pre-loaded with five “good” widgets and five “bad” widgets, stacked face to face in random order and hole orientation. Your system must then process (test and discharge) a single widget with each press of the button, until all ten widgets have been processed.
Level 4 (95)
Level 3 except your device must process (test and separate) all ten widgets automatically after a single push of the button. If less than ten widgets are loaded, your device must detect this and display a signal (e.g., turn on a yellow LED) after all of the widgets are processed.
Grading Adjustments
- ±5 for level of effort, creativity, and initiative (-5: poor; 0: average; 5: exceptional)
- ±5 for aesthetics, construction quality, and consumer appeal (-5: poor; 0: average; 5: exceptional)
- ±5 for actual construction cost and expected mass production cost (-5: expensive; 0: average; 5: inexpensive)
- ±10 for the final project report. A positive adjustment will be given for a well written and well illustrated report. (-10: poor; 0: average; 10: exceptional)
NOTE – The potential for a positive adjustment increases with the level of performance. A maximum positive adjustment is possible only for a Level 4 device.
Extra Reward:
- +5 (max) for a presentation in class during the last week of the semester (by invitation only)
Notes:
- Your TA will try to provide you with any circuit components you need (resistors, capacitors, LEDs, limited IC’s) and Walt can supply you with limited building materials and mechanical hardware. You are responsible for purchasing other stuff (special IC’s, micro switches, photo-optic pairs, miscellaneous mechanical and electrical accessories, etc.). See useful local vendors.
- If your device fails to satisfy a level’s requirements exactly or if your device’s performance falls between two levels, the score will be adjusted accordingly.
- Official trials will be during the Lab section meetings in the latter part of the semester and during other hours arranged by your TA (e.g., TA office hours). No trials will be allowed after the last class day of the semester. You may use multiple trials to progressively improve your Level score. A group is allowed only one official trial per week. Every group must also show their device during the last Lab section meeting for final evaluation of the grading adjustment categories. You are welcome to invite family and/or friends to the final Lab section meeting to see everybody’s designs.
- Selected groups will be invited (by your Instructor) to present their projects to the entire class during the last two lecture periods of the semester (see “Extra Reward” above).
- The final report is due at the last meeting of your Lab section. The report must include:
- title page with title, group number, group member names, date, etc.
- Design Summary: concise overview of how your device works. Include a well-labeled overall figure illustrating your device.
- Design Details: detailed figures (where necessary and/or helpful) and circuit diagrams. Be sure to refer to the figures and diagrams and describe them completely. The circuit diagrams in this section of the report should be well illustrated functional block diagrams; detailed pin-out wiring diagrams should be included in an Appendix.
- Design Evaluation: describe the level of performance and provide justifications for grading adjustments.
- Theoretically, the highest possible score (for a device awesome in every way and presented well) is 125 on a scale of 100. Theoretically, the lowest possible score (for no device) is -25.